
Adding users onto a Gamma Horizon phone system account

Here is a short guide explaining how to add users to your Gamma Horizon telephone system.
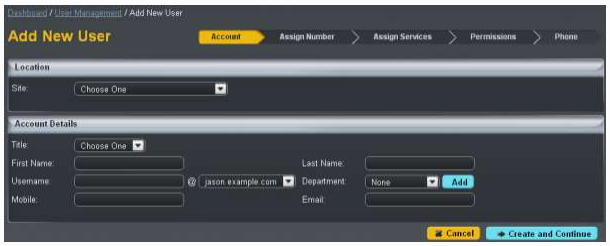
Adding users - Step 1
1. To start this process, you need to click “Add User” from the menu or on the list user page. There is an add button which will take you to the same page.
On the first page, you will need to fill in all the account details including the user’s username and the e-mail that login credentials should be sent to. Alternatively, you can simply put in your own email and then forward it when you wish/are ready to.
Adding users - Step 2
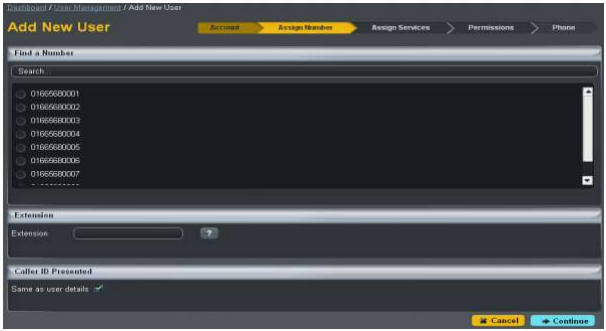
2. After you have filled in the account details you will automatically be taken to the ‘assign number’ input fields.
To proceed, click “Create and Continue”. This is where you give the user a DDI number and an extension.
The number display shows all available numbers that are assigned to the site. You can also change what is displayed when the user calls another user; this is defaulted as their name.
Adding users - Step 3
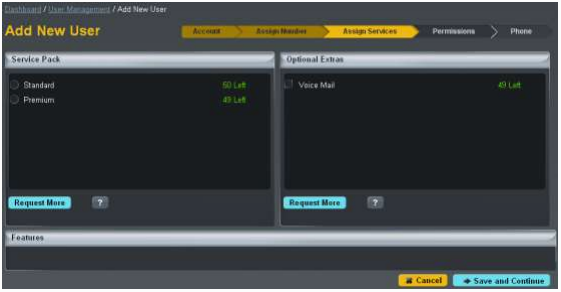
3. Once you have assigned a number to a user, you need to select what service pack they will have and whether they can have access to voice mail.
- Please note that Gamma Business Communications only offer the Premium service pack.
Also from this screen you can request more service packs. If you request more this way, you will need to go back and edit the user to complete all the remaining forms.
Adding users - Step 4
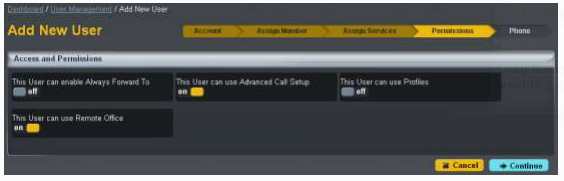
4. The next step in adding a user is to select what permissions they can have. Below you can see what permissions you can give to a user:
- Always Forward To allows all incoming numbers to be forwarded to another designated number.
- Advance Call Setup will give the user more options to configure personally. If this is turned off, the administrator is still able to edit the features.
- Profiles give the user permission to set up 4 profiles that will perform different actions if that profile is selected. For example, if a profile is set to busy then it will forward a specified number to a different VoIP number.
- Remote Office allows users to use an external number as their own number. This allows users to use mobiles as their main number so all calls will be redirected to there, depending on what other features have been set up.
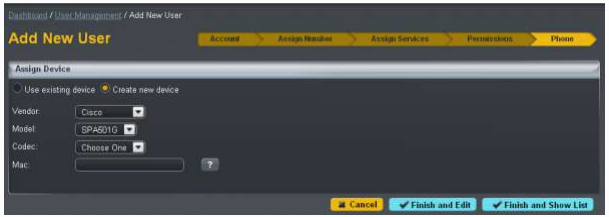
Adding users - Step 5
5. The final section is to assign the user with a device.
You can assign a device that has already been added or create a new device.
For existing devices, you just need to select what device you would like to give them by using the drop down that displays all devices that have been added.
To create a new device, you will need to select what brand the device is, what model and what MAC address.
Adding users - Step 6
6. The Codec in the phone converts speech from the handset to a digital format (IP packets) and vice versa. You will need to ensure that the maximum number of simultaneous incoming and outgoing calls does not exceed the bandwidth/codec combination arranged by your Communications Supplier.
Bandwidth estimate for various codecs are:
- G.729 codec - 30 to 50 kb/s depending on contention ratio of broadband service.
- G.711 codec – 90 to 150kb/s depending on contention ratio of broadband service.
- G.722 codec- This can only be used on external calls if the other phone in the call can support G.722. Usually 100 to 175kb/s will suffice depending on contention ratio in this case.
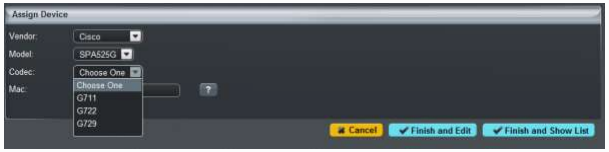
Please note that if the wrong Codec is selected and there is not enough bandwidth available you may encounter poor quality external calls over all calls from your site.
Adding users - Step 7
7. Once actioned, you can then click “Finish and Edit” to edit the user functions further, or “Finish and Show List” to view a list of all users.


